Impressions
Pixel
Introduction
We approach impression tracking in a different way to onsite tracking. When a Visitor is onsite, the Cubed tag fires and we can track the pages a visitor visited and the events they fired on your domain. However, an impression is an event we capture that is not onsite and is not normally as easy to track.
To enable this data collection, Pixels are generally implemented and are used to collect impression data from Display Banner ads and Email, although there are additional use cases.
Example
https://data.withcubed.com/[aid]/cubedimpression.gif
Configuring the Pixel
Set the account
The [aid] parameter is your Cubed Account Token - this is exactly the same value you set in the tag onsite.
It will look similar to c-a-client-uk.
If you are in doubt as to what your Cubed Account Token is, please reach out to a member of the Cubed team for clarification.
Example
https://data.withcubed.com/c-a-client-uk/cubedimpression.gif
Set Extra Parameters
Along with your Cubed Account Token you can pass standard query parameters - which Cubed will store and use for reporting in the frontend.
The additional configurable parameters available are:
- medium
- campaign
- content
- source
Example URL with params:
https://data.withcubed.com/[aid]/cubedimpression.gif?medium=[medium]&source=[source]&campaign=[campaign]&content=[content]
Each query parameter [value] can be set to the required value to be passed to Cubed upon an impression being triggered. The configuration of these parameters can often be automated by software, or manually changed by your marketeers.
Example
https://data.withcubed.com/c-a-client-uk/cubedimpression.gif?medium=display&source=another-website&campaign=my-campaign&content=special-item
Deploying the Pixel
To actually use the Impression pixel you must add it to your HTML as a standard image using the <img> tag. When the HTML loads, it will fetch our 1x1 pixel and trigger an impression event, posting your query parameters for collection to the Cubed server.
Below is the final example of adding the pixel as an <img> with all parameters filled in.
Example
<img src="https://data.withcubed.com/c-a-client-uk/cubedimpression.gif?medium=paid&source=email&campaign=my-campaign&content=red-sale-2021"/>
This code snippet can then be placed anywhere in your HTML - including the <header>, <body>, <footer> - and will fire as soon as the HTML page loads.
For clarity, when the pixel loads it is only 1x1(pixels) and thus invisible on the page, with the load itself triggering the "impression" event.
First Party Tracking
The Impression pixel in the example currently points at data.withcubed.com meaning it is a Third Party request and will drop a Third Party Cookie.
However, if you have followed the process outlined in "First Party Cookies" http://tag.docs.withcubed.com/tagging/tag-base/#first-party-cookies then you will have a subdomain setup for Cubed on your site, which would look something like: cubed.client.com.
With this in mind you can fire the impression pixel to this endpoint rather than data.withcubed.com. We recommend using this type of request because as it points to your domain, it gives the onsite tracking tag an increased likelihood of joining both impression and onsite data together for a given user.
Example
<img src="https://cubed.client.com/c-a-client-uk/cubedimpression.gif?medium=paid&source=email&campaign=my-campaign&content=red-sale-2021"/>
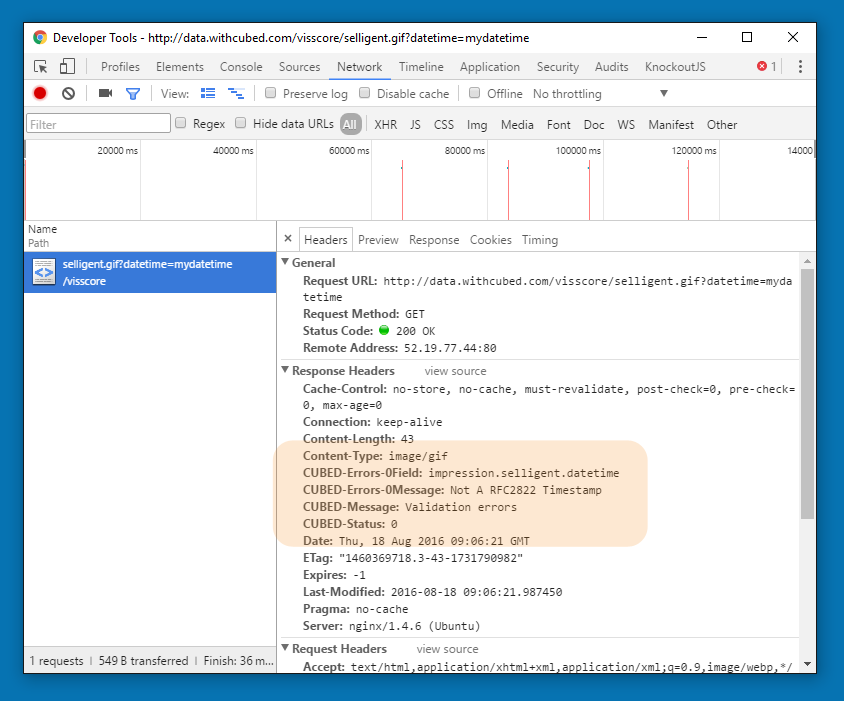
Debugging
As the response for this URL contains a 1x1 pixel gif, validation messages are available via HTTP response headers prefixed with CUBED-
Third-Party Cookies
When tracking impressions using Third-Party Cookies, CUBED generates a random Sync ID for every impression. This Sync ID is stored within the Third-Party Cookie, and when the user returns to site, the Sync ID is used to join the two visits together.
